Saturday, April 27, 2013

Nibbles game clone in PHP GTK

In this part of the PHP GTK programming tutorial, we will create a Nibbles game clone.
Nibbles is an older classic video game. It was first created in late 70s. Later it was brought to PCs. In this game the player controls a snake. The objective is to eat as many apples as possible. Each time the snake eats an apple, its body grows. The snake must avoid the walls and its own body.

Development

The size of each of the joints of a snake is 10px. The snake is controlled with the cursor keys. Initially, the snake has three joints. The game starts immediately. When the game is finished, we display "Game Over" message in the center of the window.
The code is split into two files. board.php and nibbles.php.
<?php

// board.php

define("WIDTH", 300);
define("HEIGHT", 270);
define("DOT_SIZE", 10);
define("ALL_DOTS", WIDTH * HEIGHT / (DOT_SIZE * DOT_SIZE));
define("RAND_POS", 26);
 

class Board extends GtkDrawingArea {

    public function __construct() { 

        parent::__construct(); 

        $this->modify_bg(Gtk::STATE_NORMAL, new GdkColor(6400, 6400, 6440));
         
        $this->connect('expose_event', array($this, 'on_expose')); 

        $this->init_game();

    } 
    
    public function init_game() {

        $this->x = array_fill(0, ALL_DOTS, 0);
        $this->y = array_fill(0, ALL_DOTS, 0);

        $this->left = false;
        $this->right = true;
        $this->up = false;
        $this->down = false;
        $this->inGame = true;
        $this->dots = 3;

        for ($i=0; $i<=$this->dots; $i++) {
            $this->x[$i] = 50 - $i * 10;
            $this->y[$i] = 50;
        }
        
        try {
            $this->dot = CairoImageSurface::createFromPng("dot.png");
            $this->head = CairoImageSurface::createFromPng("head.png");
            $this->apple = CairoImageSurface::createFromPng("apple.png");
        } catch( Exception  $e) {
            echo $e->getMessage();
            echo "cannot load images";
            exit;
        }

        $this->locate_apple();
        $this->set_can_focus(true);

        Gtk::timeout_add(100, array($this, 'on_timer'));

     }

    public function on_timer() {

        if ($this->inGame) {
            $this->check_apple();
            $this->check_collision();
            $this->move();
            $this->queue_draw();
            return true;
        } else {
            return false;
        }
    }
        

    public function on_expose() {
    
        $cr = $this->window->cairo_create();

        if ($this->inGame) {
            $this->draw_objects($cr);
        } else {
            $this->game_over($cr);
        }
    }
    
    public function draw_objects($cr) {
    
        $cr->SetSourceRgb(0, 0, 0);
        $cr->paint();

        $cr->setSourceSurface($this->apple, 
            $this->apple_x, $this->apple_y);
        $cr->paint();

        for ($z=0; $z<=$this->dots; $z++) {
            if ($z == 0) {
                $cr->setSourceSurface($this->head, 
                    $this->x[$z], $this->y[$z]);
                $cr->paint();
            } else {
                $cr->setSourceSurface($this->dot, 
                    $this->x[$z], $this->y[$z]);
                $cr->paint();
            } 
        }
    }

    public function game_over($cr) {

        $c_x = $this->get_allocation()->width/2;
        $c_y = $this->get_allocation()->height/2;

        $cr->SetFontSize(15);
        $cr->SetSourceRgb(65535, 65535, 65535);

        $te = $cr->TextExtents("Game Over");
        
        $cr->MoveTo($c_x - $te['width']/2, $c_y);
        $cr->ShowText("Game Over");
    }


    public function check_apple() {

        if ($this->x[0] == $this->apple_x 
                and $this->y[0] == $this->apple_y) {
            $this->dots = $this->dots + 1;
            $this->locate_apple();
        }
    }
    
    public function move() {

        $z = $this->dots;

        while ($z > 0) {
            $this->x[$z] = $this->x[($z - 1)];
            $this->y[$z] = $this->y[($z - 1)];
            $z--;
        }

        if ($this->left) {
            $this->x[0] -= DOT_SIZE;
        }

        if ($this->right) {
            $this->x[0] += DOT_SIZE;
        }

        if ($this->up) {
            $this->y[0] -= DOT_SIZE;
        }

        if ($this->down) {
            $this->y[0] += DOT_SIZE;
        }
        
     }

    public function check_collision() {

        $z = $this->dots;
       
        while ($z > 0) {
            if ($z > 4 and $this->x[0] == $this->x[$z] 
                       and $this->y[0] == $this->y[$z]) {
                $this->inGame = false;
            }
            $z--;
        }

        if ($this->y[0] > HEIGHT - DOT_SIZE) {
            $this->inGame = false;
        }
        
        if ($this->y[0] < 0) {
            $this->inGame = false;
        }
        
        if ($this->x[0] > WIDTH - DOT_SIZE) {
            $this->inGame = false;
        }
        
        if ($this->x[0] < 0) {
            $this->inGame = false;
        }
        
    }

    public function locate_apple() {
    
        $r = rand(0, RAND_POS);
        $this->apple_x = $r * DOT_SIZE;
        $r = rand(0, RAND_POS);
        $this->apple_y = $r * DOT_SIZE;
    }

    public function on_key_down($event) {

        $key = $event->keyval;

        if ($key == Gdk::KEY_Left and !$this->right) {
            $this->left = true;
            $this->up = false;
            $this->down = false;
        }

        if ($key == Gdk::KEY_Right and !$this->left) {
            $this->right = true;
            $this->up = false;
            $this->down = false;
        }

        if ($key == Gdk::KEY_Up and !$this->down) {
            $this->up = true;
            $this->right = false;
            $this->left = false;
        }

        if ($key == Gdk::KEY_Down and !$this->up) {
            $this->down = true;
            $this->right = false;
            $this->left = false;
        }
    }
}
?>
This is board.php file.
define("WIDTH", 300);
define("HEIGHT", 270);
define("DOT_SIZE", 10);
define("ALL_DOTS", WIDTH * HEIGHT / (DOT_SIZE * DOT_SIZE));
define("RAND_POS", 26);
The WIDTH and HEIGHT constants determine the size of the Board. The DOT_SIZE is the size of the apple and the dot of the snake. The ALL_DOTS constant defines the maximum number of possible dots on the Board. The RAND_POS constant is used to calculate a random position of an apple.
$this->x = array_fill(0, ALL_DOTS, 0);
$this->y = array_fill(0, ALL_DOTS, 0);
These two arrays store x, y coordinates of all possible joints of a snake.
The init_game() method initializes variables, loads images and starts a timeout function.
if ($this->inGame) {
    $this->check_apple();
    $this->check_collision();
    $this->move();
    $this->queue_draw();
    return true;
} else {
    return false;
}
Every 140 ms, the on_timer() method is called. If we are in the game, we call three methods, that build the logic of the game. The queue_draw() method forces the widget to be redrawn. This will reflect the changes of the game on the board. Otherwise we return false, which stops the timer event.
$cr = $this->window->cairo_create();

if ($this->inGame) {
    $this->draw_objects($cr);
} else {
    $this->game_over($cr);
}    
Inside the on_expose() method, we check the $this->inGame variable. If it is true, we draw our objects. The apple and the snake joints. Otherwise we display "Game over" text.
public function draw_objects($cr) {

    $cr->SetSourceRgb(0, 0, 0);
    $cr->paint();

    $cr->setSourceSurface($this->apple, 
        $this->apple_x, $this->apple_y);
    $cr->paint();

    for ($z=0; $z<=$this->dots; $z++) {
        if ($z == 0) {
            $cr->setSourceSurface($this->head, 
                $this->x[$z], $this->y[$z]);
            $cr->paint();
        } else {
            $cr->setSourceSurface($this->dot, 
                $this->x[$z], $this->y[$z]);
            $cr->paint();
        } 
    }
}
The draw_objects() method draws the apple and the joints of the snake. The first joint of a snake is its head, which is represented by a red circle.
If the game is over, we call the game_over() method. This method shows "Game Over" in the center of the window.
$c_x = $this->get_allocation()->width/2;
$c_y = $this->get_allocation()->height/2;
Here we get the center point of the window.
$cr->SetFontSize(15);
$cr->SetSourceRgb(65535, 65535, 65535);
We set the font size and color for the text. The background is black so the font will be in white color.
$te = $cr->TextExtents("Game Over");
We get the text extents of the string. This is needed in order to position the text in the center of the window.
$cr->MoveTo($c_x - $te['width']/2, $c_y);
$cr->ShowText("Game Over");
We move to the center and display the text.
public function check_apple() {

    if ($this->x[0] == $this->apple_x 
            and $this->y[0] == $this->apple_y) {
        $this->dots = $this->dots + 1;
        $this->locate_apple();
    }
}
The check_apple() method checks, if the snake has hit the apple object. If so, we add another snake joint and call the locate_apple() method, which randomly places a new apple object.
In the move() method we have the key algorithm of the game. To understand it, look at how the snake is moving. You control the head of the snake. You can change its direction with the cursor keys. The rest of the joints move one position up the chain. The second joint moves where the first was, the third joint where the second was etc.
while ($z > 0) {
    $this->x[$z] = $this->x[($z - 1)];
    $this->y[$z] = $this->y[($z - 1)];
    $z--;
}
This code moves the joints up the chain.
if ($this->left) {
    $this->x[0] -= DOT_SIZE;
}
Move the head to the left.
In the check_collision() method, we determine if the snake has hit itself or one of the walls.
while ($z > 0) {
    if ($z > 4 and $this->x[0] == $this->x[$z] 
                and $this->y[0] == $this->y[$z]) {
        $this->inGame = false;
    }
    $z--;
}
Finish the game, if the snake hits one of its joints with the head.
if ($this->y[0] > HEIGHT - DOT_SIZE) {
  $this->inGame = false;
}
Finish the game, if the snake hits the bottom of the Board.
The locate_apple() method locates an apple randomly on the board.
$r = rand(0, RAND_POS);
We get a random number from 0 to RAND_POS - 1.
$this->apple_x = $r * DOT_SIZE;
...
$this->apple_y = $r * DOT_SIZE;
These lines set the x, y coordinates of the apple object.
In the on_key_down() method of the Board class, we determine the keys that were pressed.
if ($key == Gdk::KEY_Left and !$this->right) {
    $this->left = true;
    $this->up = false;
    $this->down = false;
}
If we hit the left cursor key, we set $this->left variable to true. This variable is used in the move() method to change coordinates of the snake object. Notice also, that when the snake is heading to the right, we cannot turn immediately to the left.
<?php
 
/* 
ZetCode PHP GTK tutorial

In this program, we create a Nibbles
game clone. 

author: Jan Bodnar
website: www.zetcode.com
last modified: September 2011
*/

include 'board.php';

class Example extends GtkWindow { 
     

    public function __construct() { 

        parent::__construct(); 
         
        $this->init_ui();

    } 

    private function init_ui() {

        $this->set_title('Nibbles');         
        $this->connect_simple('destroy', array('gtk', 'main_quit')); 

        $this->board = new Board();
        $this->board->connect('key-press-event', array($this, 'on_key_down'));

        $this->add($this->board);
      
        $this->set_default_size(300, 270); 
        $this->set_position(GTK::WIN_POS_CENTER);
        $this->show_all();         
    }

    public function on_key_down($sender, $event) {
     
        $key = $event->keyval;
        $this->board->on_key_down($event);
    }
} 
     
new Example(); 
Gtk::main();
 
?>
This is the nibbles.php file. In this file, we set up the Nibbles game.
public function on_key_down($sender, $event) {
  
    $key = $event->keyval;
    $this->board->on_key_down($event);
}
In this class, we catch the key press events. And delegate the processing to the on_key_down() method of the board class.
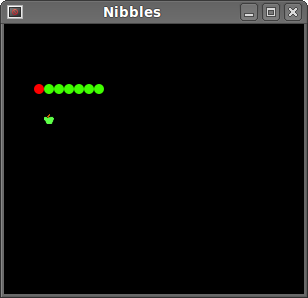
Nibbles
Figure: Nibbles
This was the Nibbles computer game programmed with the GTK library and the PHP programming language.

Custom widget in PHP GTK

Toolkits usually provide only the most common widgets like buttons, text widgets, sliders etc. No toolkit can provide all possible widgets. If there is a need for a more specialized widget, we must create it ourselves.
Custom widgets are created by using the drawing tools provided by the toolkit. There are two possibilities. A programmer can modify or enhance an existing widget. Or he can create a custom widget from scratch.

Burning widget

This is an example of a widget, that we create from scratch. It is based on a minimal GtkWidget widget. This custom widget can be found in various media burning applications, like Nero Burning ROM.
<?php
 
/* 
ZetCode PHP GTK tutorial

This example creates a burning
custom widget.

author: Jan Bodnar
website: www.zetcode.com
last modified: August 2011
*/

class Burning extends GtkDrawingArea { 
     

    public function __construct($par) { 

        parent::__construct(); 
 
        $this->par = $par;          

        $this->init_ui();

    } 

    public function init_ui() {

        $this->num = array("75", "150", "225", "300", 
            "375", "450", "525", "600", "675");
 
        $this->set_size_request(1, 30);
        $this->connect('expose_event', array($this, 'on_expose')); 
 
    }

    public function on_expose() {
        $cr = $this->window->cairo_create();
        $this->draw_widget($cr);
    }

    public function draw_widget($cr) {
 
        $cr->SetLineWidth(0.8);
        $cr->SelectFontFace("Courier", CairoFontSlant::NORMAL, 
            CairoFontWeight::NORMAL);
        $cr->SetFontSize(11);

        $width = $this->get_allocation()->width;
     
        $this->cur_width = $this->par->get_cur_value();

        $step = round($width / 10.0);

        $till = ($width / 750.0) * $this->cur_width;
        $full = ($width / 750.0) * 700;

        if ($this->cur_width >= 700) {
            
            $cr->SetSourceRgb(1.0, 1.0, 0.72);
            $cr->Rectangle(0, 0, $full, 30);
            $cr->Clip();
            $cr->Paint();
            $cr->ResetClip();
            
            $cr->SetSourceRgb(1.0, 0.68, 0.68).
            $cr->Rectangle($full, 0, $till-$full, 30);
            $cr->Clip();
            $cr->Paint();
            $cr->ResetClip();

        } else {
            $cr->SetSourceRgb(1.0, 1.0, 0.72);
            $cr->Rectangle(0, 0, $till, 30);
            $cr->Clip();
            $cr->Paint();
            $cr->ResetClip();
        }
       

        $cr->SetSourceRgb(0.35, 0.31, 0.24);
        $len = count($this->num);

        for ($i=1; $i <= $len; $i++) {
            $cr->MoveTo($i*$step, 0);
            $cr->LineTo($i*$step, 5);
            $cr->Stroke();
            
            $te = $cr->TextExtents($this->num[$i-1]);
            $cr->MoveTo($i*$step-$te['width']/2, 15);
            $cr->TextPath($this->num[$i-1]);
            $cr->Stroke();
        }        
    }
}
            

class Example extends GtkWindow { 
     

    public function __construct() { 

        parent::__construct(); 
         
        $this->init_ui();

    } 

    private function init_ui() {

        $this->set_title('Burning widget');         
        $this->connect_simple('destroy', array('gtk', 'main_quit')); 

        $this->cur_value = 0;
       
        $vbox = new GtkVBox(false, 2);
        
        $scale = new GtkHScale();
        $scale->set_range(0, 750);
        $scale->set_digits(0);
        $scale->set_size_request(160, 35);
        $scale->set_value($this->cur_value);
        
        $scale->connect('value-changed', array($this, 'on_changed'));
        
        $fixed = new GtkFixed();
        $fixed->put($scale, 50, 50);
        
        $vbox->pack_start($fixed);
        
        $this->burning = new Burning($this);
        $vbox->pack_start($this->burning, false, false, 0);

        $this->add($vbox);

        $this->set_default_size(350, 200); 
        $this->set_position(GTK::WIN_POS_CENTER);
        $this->show_all();         
    }

    public function on_changed($sender) {
    
        $this->cur_value = $sender->get_value();
        $this->burning->queue_draw();
    }
    
    public function get_cur_value() {
        return $this->cur_value;
    }
} 
     
new Example(); 
Gtk::main();
 
?>
We put a GtkDrawingArea on the bottom of the window and draw the entire widget manually. All the important code resides in the draw_widget() which is called from the on_expose() method of the Burning class. This widget shows graphically the total capacity of a medium and the free space available to us. The widget is controlled by a scale widget. The minimum value of our custom widget is 0, the maximum is 750. If we reach value 700, we began drawing in red color. This normally indicates overburning.
$this->num = array("75", "150", "225", "300", 
    "375", "450", "525", "600", "675");
These numbers are shown on the burning widget. They show the capacity of the medium.
$this->cur_width = $this->par->get_cur_value();
From the parent widget, we get the current value of the scale widget.
$till = ($width / 750.0) * $this->cur_width;
$full = ($width / 750.0) * 700;
We use the $width variable to do the transformations. Between the values of the scale and the custom widget's measures. Note that we use floating point values. We get greater precision in drawing. The $till parameter determines the total size to be drawn. This value comes from the slider widget. It is a proportion of the whole area. The $full parameter determines the point, where we begin to draw in red color.
$cr->SetSourceRgb(1.0, 1.0, 0.72);
$cr->Rectangle(0, 0, $full, 30);
$cr->Clip();
$cr->Paint();
$cr->ResetClip();
We draw a yellow rectangle up to point, where the medium is full.
$te = $cr->TextExtents($this->num[$i-1]);
$cr->MoveTo($i*$step-$te['width']/2, 15);
$cr->TextPath($this->num[$i-1]);
$cr->Stroke();
This code here draws the numbers on the burning widget. We calculate the text extents to position the text correctly.
public function on_changed($sender) {

    $this->cur_value = $sender->get_value();
    $this->burning->queue_draw();
}
We get the value from the scale widget, store it in the $this->cur_value variable for later use. We redraw the burning widget.
Burning widget
Figure: Burning widget
In this chapter, we created a custom widget in GTK and PHP programming language.

Painting with Cairo in PHP GTK

In this part of the PHP GTK tutorial, we will do some painting with the Cairo library. Currently, Seed supports only a small portion of the Cairo library.
Cairo is a library for creating 2D vector graphics. We can use it to draw our own widgets, charts or various effects or animations.
Cairo for PHP is a separate project from PHP GTK. In addition to PHP GTK, we need to install Cairo too. Prior to building the library, we must have libcairo2-dev package installed on our system.
svn co http://svn.php.net/repository/pecl/cairo/trunk cairo
cd cairo/
$ phpize5
$ ./configure 
$ make
$ make install
The above commands were used to install Cairo for PHP at the time of the creation of this tutorial.
Finally, after we have installed Cairo, we need to enable Cairo library for our PHP scripts.
$ sudo vi /etc/php5/cli/php.ini 

;;;;;;;;;;;;;;;;;;;;;;
; Dynamic Extensions ;
;;;;;;;;;;;;;;;;;;;;;;

;
extension=php_gtk2.so
extension=cairo.so
We edit the php.ini file and add the Cairo dynamic extension.

Colors

In the first example, we will work with colors. A color is an object representing a combination of Red, Green, and Blue (RGB) intensity values. Cairo valid RGB values are in the range 0 to 1.
<?php
 
/* 
ZetCode PHP GTK tutorial

In this program, we will draw three
colored rectangles on the drawing area
using Cairo.

author: Jan Bodnar
website: www.zetcode.com
last modified: August 2011
*/

class Example extends GtkWindow { 
     

    public function __construct() { 

        parent::__construct(); 
         
        $this->init_ui();

    } 

    public function init_ui() {

        $this->set_title('Colors');         
        $this->connect_simple('destroy', array('gtk', 'main_quit')); 

        $darea = new GtkDrawingArea();
        $darea->connect('expose_event', array($this, 'on_expose')); 
        
        $this->add($darea);    

        $this->set_default_size(360, 100); 
        $this->set_position(GTK::WIN_POS_CENTER);
        $this->show_all();         
    }

    public function on_expose($darea, $event) {

            $cr = $darea->window->cairo_create();
            $this->draw_colors($cr);        
   
    }

    public function draw_colors($cr) {
    
        $cr->setSourceRgb(0.2, 0.23, 0.9);
        $cr->rectangle(10, 15, 90, 60);
        $cr->fill();
        
        $cr->setSourceRgb(0.9, 0.1, 0.1);
        $cr->rectangle(130, 15, 90, 60);
        $cr->fill();

        $cr->setSourceRgb(0.4, 0.9, 0.4);
        $cr->rectangle(250, 15, 90, 60);
        $cr->fill();            
    }   
} 
     
new Example(); 
Gtk::main();
 
?>
In our example, we will draw three rectangles and fill them with three different colors.
$darea = new GtkDrawingArea();
We will be doing our drawing operations on the GtkDrawingArea widget.
$darea->connect('expose_event', array($this, 'on_expose')); 
When the window needs to be redrawn, the the expose_event is triggered. In response to this event, we call the on_expose() method.
$cr = $darea->window->cairo_create();
We create the cairo context object from the GdkWindow of the drawing area. The context is an object onto which we do all our drawings.
$this->draw_colors($cr);   
The actual drawing is delegated to the draw_colors() method.
$cr->setSourceRgb(0.2, 0.23, 0.9);
The setSourceRgb() method sets a color for the cairo context. The three parameters of the method are the color intensity values.
$cr->rectangle(10, 15, 90, 60);
We draw a rectangle. The first two parameters are the x, y coordinates of the top left corner of the rectangle. The last two parameters are the width and height of the rectangle.
$cr->fill();
We fill the inside of the rectangle with the current color.
Colors
Figure: Colors

Basic shapes

The next example draws some basic shapes onto the window.
<?php
 
/* 
ZetCode PHP GTK tutorial

This code example draws basic shapes
with the Cairo library.

author: Jan Bodnar
website: www.zetcode.com
last modified: August 2011
*/

class Example extends GtkWindow { 
     

    public function __construct() { 

        parent::__construct(); 
         
        $this->init_ui();

    } 

    public function init_ui() {

        $this->set_title('Basic shapes');         
        $this->connect_simple('destroy', array('gtk', 'main_quit')); 

        $darea = new GtkDrawingArea();
        $darea->connect('expose_event', array($this, 'on_expose')); 
        
        $this->add($darea);    

        $this->set_default_size(390, 240); 
        $this->set_position(GTK::WIN_POS_CENTER);
        $this->show_all();         
    }

    public function on_expose($darea, $event) {

        $cr = $darea->window->cairo_create();
        $this->draw_shapes($cr);        

    }

    public function draw_shapes($cr) {
    
        $cr->SetSourceRgb(0.6, 0.6, 0.6);

        $cr->rectangle(20, 20, 120, 80);
        $cr->rectangle(180, 20, 80, 80);
        $cr->fill();

        $cr->arc(330, 60, 40, 0, 2*M_PI);
        $cr->fill();
        
        $cr->arc(90, 160, 40, M_PI/4, M_PI);
        $cr->fill();

        $cr->translate(220, 180);
        $cr->scale(1, 0.7);
        $cr->arc(0, 0, 50, 0, 2*M_PI);
        $cr->fill();          
    }   
} 
     
new Example(); 
Gtk::main();
 
?>
In this example, we will create a rectangle, a square, a circle, an arc and an ellipse. We draw outlines in blue color, insides in white.
$cr->rectangle(20, 20, 120, 80);
$cr->rectangle(180, 20, 80, 80);
$cr->fill();
These lines draw a rectangle and a square.
$cr->arc(330, 60, 40, 0, 2*M_PI);
$cr->fill();
Here the arc() method draws a full circle.
$cr->translate(220, 180);
$cr->scale(1, 0.7);
$cr->arc(0, 0, 50, 0, 2*M_PI);
$cr->fill();  
The translate() method moves the object to a specific point. If we want to draw an oval, we do some scaling first. Here the scale() method shrinks the y axis.
Basic shapes
Figure: Basic shapes

Transparent rectangles

Transparency is the quality of being able to see through a material. The easiest way to understand transparency is to imagine a piece of glass or water. Technically, the rays of light can go through the glass and this way we can see objects behind the glass.
In computer graphics, we can achieve transparency effects using alpha compositing. Alpha compositing is the process of combining an image with a background to create the appearance of partial transparency. The composition process uses an alpha channel. (wikipedia.org, answers.com)
<?php
 
/* 
ZetCode PHP GTK tutorial

This code example draws nine rectangles
with different levels of transparency.

author: Jan Bodnar
website: www.zetcode.com
last modified: August 2011
*/

class Example extends GtkWindow { 
     

    public function __construct() { 

        parent::__construct(); 
         
        $this->init_ui();

    } 

    public function init_ui() {

        $this->set_title('Transparent rectangles');         
        $this->connect_simple('destroy', array('gtk', 'main_quit')); 

        $darea = new GtkDrawingArea();
        $darea->connect('expose_event', array($this, 'on_expose')); 
        
        $this->add($darea);    

        $this->set_default_size(590, 90); 
        $this->set_position(GTK::WIN_POS_CENTER);
        $this->show_all();         
    }

    public function on_expose($darea, $event) {

        $cr = $darea->window->cairo_create();
        $this->draw_recs($cr);        

    }

    public function draw_recs($cr) {

        for ($i=1; $i<=10; $i++) {
            $cr->SetSourceRgba(0, 0, 1, $i*0.1);
            $cr->rectangle(50*$i, 20, 40, 40);
            $cr->fill();
        }     
    }   
} 
     
new Example(); 
Gtk::main();
 
?>
In the example we will draw ten rectangles with different levels of transparency.
$cr->SetSourceRgba(0, 0, 1, $i*0.1);
The last parameter of the set_source_rgba() method is the alpha transparency.
Transparent rectangles
Figure: Transparent rectangles

Donut

In the following example we create a complex shape by rotating a bunch of ellipses.
 
<?php
 
/* 
ZetCode PHP GTK tutorial

In this program, we draw a donut shape
by rotating a bunch of ellipses. 

author: Jan Bodnar
website: www.zetcode.com
last modified: August 2011
*/

class Example extends GtkWindow { 
     

    public function __construct() { 

        parent::__construct(); 
         
        $this->init_ui();

    } 

    public function init_ui() {

        $this->set_title('Donut');         
        $this->connect_simple('destroy', array('gtk', 'main_quit')); 

        $darea = new GtkDrawingArea();
        $darea->connect('expose_event', array($this, 'on_expose')); 
        
        $this->add($darea);    

        $this->set_default_size(350, 250); 
        $this->set_position(GTK::WIN_POS_CENTER);
        $this->show_all();         
    }

    public function on_expose($darea, $event) {

            $cr = $darea->window->cairo_create();
            $this->draw_donut($cr);        
   
    }

    public function draw_donut($cr) {
    
        $cr->SetLineWidth(0.5);

        $w = $this->get_allocation()->width;
        $h = $this->get_allocation()->height;
       
        $cr->translate($w/2, $h/2);
        $cr->arc(0, 0, 120, 0, 2*M_PI);
        $cr->stroke();
         
        for ($i=1; $i<=36; $i++) {
            $cr->save();
            $cr->rotate($i*M_PI/36);
            $cr->scale(0.3, 1);
            $cr->arc(0, 0, 120, 0, 2*M_PI);
            $cr->restore();
            $cr->stroke();
        }
    }   
} 
     
new Example(); 
Gtk::main();
 
?>
In this example, we create a donut. The shape resembles a cookie, hence the name donut.
$cr->translate($w/2, $h/2);
$cr->arc(0, 0, 120, 0, 2*M_PI);
$cr->stroke();
In the beginning there is an ellipse.
for ($i=1; $i<=36; $i++) {
    $cr->save();
    $cr->rotate($i*M_PI/36);
    $cr->scale(0.3, 1);
    $cr->arc(0, 0, 120, 0, 2*M_PI);
    $cr->restore();
    $cr->stroke();
}
After several rotations, there is a donut.

Drawing text

In the next example, we draw some text on the window.
<?php
 
/* 
ZetCode PHP GTK tutorial

In this program, we draw text on the
window. 

author: Jan Bodnar
website: www.zetcode.com
last modified: August 2011
*/

class Example extends GtkWindow { 
     

    public function __construct() { 

        parent::__construct(); 
         
        $this->init_ui();

    } 

    public function init_ui() {

        $this->set_title('Soulmate');         
        $this->connect_simple('destroy', array('gtk', 'main_quit')); 

        $darea = new GtkDrawingArea();
        $darea->connect('expose_event', array($this, 'on_expose')); 
        
        $this->add($darea);    

        $this->set_default_size(350, 250); 
        $this->set_position(GTK::WIN_POS_CENTER);
        $this->show_all();         
    }

    public function on_expose($darea, $event) {

            $cr = $darea->window->cairo_create();
            $this->draw_text($cr);        
   
    }

    public function draw_text($cr) {
    
        $cr->SetSourceRgb(0.1, 0.1, 0.1);
         
        $cr->SelectFontFace("Purisa", CairoFontSlant::NORMAL, 
            CairoFontWeight::NORMAL);
        $cr->SetFontSize(13);
       
        $cr->MoveTo(20, 30);
        $cr->ShowText("Most relationships seem so transitory");
        $cr->MoveTo(20, 60);
        $cr->ShowText("They're all good but not the permanent one");
        $cr->MoveTo(20, 120);
        $cr->ShowText("Who doesn't long for someone to hold");
        $cr->MoveTo(20, 150);
        $cr->ShowText("Who knows how to love without being told");
        $cr->MoveTo(20, 180);
        $cr->ShowText("Somebody tell me why I'm on my own");
        $cr->MoveTo(20, 210);
        $cr->ShowText("If there's a soulmate for everyone");
    }   
} 
     
new Example(); 
Gtk::main();
 
?>
We display part of the lyrics from the Natasha Bedingfields Soulmate song.
$cr->SelectFontFace("Purisa", CairoFontSlant::NORMAL, 
    CairoFontWeight::NORMAL);
Here we specify the font, that we use. Purisa normal.
$cr->SetFontSize(13);
We specify the size of the font.
$cr->MoveTo(20, 30);
We move to the point, where we will draw the text.
$cr->ShowText("Most relationships seem so transitory");
The ShowText() method draws text onto the window.
Soulmate
Figure: Soulmate
In this chapter of the PHP GTK tutorial, we were painting with Cairo library.

Dialogs in PHP GTK

In this part of the PHP GTK programming tutorial, we will introduce dialogs.

Dialog windows or dialogs are an indispensable part of most modern GUI applications. A dialog is defined as a conversation between two or more persons. In a computer application a dialog is a window which is used to "talk" to the application. A dialog is used to input data, modify data, change the application settings etc. Dialogs are important means of communication between a user and a computer program.

GtkMessageDialog

Message dialogs are convenient dialogs that provide messages to the user of the application. The message consists of textual and image data. The GtkMessageDialog is used to create message dialogs.
<?php

/* 
ZetCode PHP GTK tutorial

This example demonstrates a
GtkMessageDialog.

author: Jan Bodnar
website: www.zetcode.com
last modified: September 2011
*/
 
class Example extends GtkWindow { 
     
    public function __construct() { 

        parent::__construct(); 
         
        $this->init_ui();

    } 

    public function init_ui() {

        $this->set_title('GtkMessageDialog');         
        $this->connect_simple('destroy', array('gtk', 'main_quit')); 

        $fixed = new GtkFixed();              

        $button = new GtkButton("Information");
        $button->set_size_request($button->size_request());
        $button->connect('clicked', array($this, 'on_clicked'));
        
        $fixed->put($button, 50, 50);
        $this->add($fixed); 

        $this->set_default_size(250, 200); 
        $this->set_position(GTK::WIN_POS_CENTER);
        $this->show_all();         
    }

    public function on_clicked($sender) {

            $md = new GtkMessageDialog($this, Gtk::DIALOG_MODAL,
                Gtk::MESSAGE_INFO, Gtk::BUTTONS_OK, "Download completed.");
            $md->set_title("Information");    
            $md->run();
            $md->destroy();
    }
} 
     
new Example(); 
Gtk::main();
 
?>
We show a button on the window. When we click on the button, an information message is displayed.
$button = new GtkButton("Information");
This is a button, which will show a dialog, when we click on it.
public function on_clicked($sender) {

        $md = new GtkMessageDialog($this, Gtk::DIALOG_MODAL,
            Gtk::MESSAGE_INFO, Gtk::BUTTONS_OK, "Download completed.");
        $md->set_title("Information");    
        $md->run();
        $md->destroy();
}
If we click on the info button, the Information dialog is displayed. The Gtk::DIALOG_MODAL flag makes the dialog modal. The Gtk::MESSAGE_INFO specifies the type of the dialog. In our case it is an information dialog. Different icons are chosen for various dialog types. The Gtk::BUTTONS_OK shows the OK button on the dialog. The last parameter is the message displayed. We set the title of the dialog with the set_title() method. The dialog is displayed with the run() method. The programmer must also call either the destroy() or the hide() method in the end.
Information message dialog
Figure: Information message dialog

GtkAboutDialog

The GtkAboutDialog displays information about the application. It can display a logo, the name of the application, version, copyright, website or license information. It is also possible to give credits to the authors, documenters, translators and artists.
<?php

/* 
ZetCode PHP GTK tutorial

This example demonstrates the
AboutDialog dialog.

author: Jan Bodnar
website: www.zetcode.com
last modified: September 2011
*/
 
class Example extends GtkWindow { 
     
    public function __construct() { 

        parent::__construct(); 
         
        $this->init_ui();

    } 

    public function init_ui() {

        $this->set_title('About Battery');         
        $this->connect_simple('destroy', array('gtk', 'main_quit')); 

        $fixed = new GtkFixed();              

        $button = new GtkButton("About");
        $button->set_size_request(80, 30);
        $button->connect('clicked', array($this, 'on_clicked'));
        
        $fixed->put($button, 50, 50);
        $this->add($fixed); 

        $this->set_default_size(250, 200); 
        $this->set_position(GTK::WIN_POS_CENTER);
        $this->show_all();         
    }

    public function on_clicked($sender) {

        $about = new GtkAboutDialog();
        $about->set_program_name("Battery");
        $about->set_version("0.1");
        $about->set_copyright("(c) Jan Bodnar");
        $about->set_comments("Battery is a simple tool for battery checking");
        $about->set_website("http://www.zetcode.com");
        $about->set_logo(GdkPixbuf::new_from_file("battery.png"));
        $about->run();
        $about->destroy();
    }

} 
     
new Example(); 
Gtk::main();
 
?>
The code example uses a GtkAboutDialog with some of its features.
$about = new GtkAboutDialog();
We create an instance of the GtkAboutDialog.
$about->set_program_name("Battery");
$about->set_version("0.1");
$about->set_copyright("(c) Jan Bodnar");
Here we specify the name, the version and the copyright of the program.
$about->set_logo(GdkPixbuf::new_from_file("battery.png"));
This line creates a logo.
GtkAboutDialog
Figure: GtkAboutDialog

GtkFontSelectionDialog

The GtkFontSelectionDialog is a dialog for selecting fonts. It is typically used in applications, that do some text editing or formatting.
<?php

/* 
ZetCode PHP GTK tutorial

In this example, we change the font
of a label with the GtkFontSelectionDialog.

author: Jan Bodnar
website: www.zetcode.com
last modified: September 2011
*/
 
class Example extends GtkWindow { 
     
    private $label;

    public function __construct() { 

        parent::__construct(); 
         
        $this->init_ui();

    } 

    private function init_ui() {

        $this->set_title('FontSelectionDialog');         
        $this->connect_simple('destroy', array('gtk', 'main_quit')); 

        $this->set_border_width(10);
        $this->label = new GtkLabel("The only victory over love is flight.");
        $button = new GtkButton("Select font");
        $button->connect('clicked', array($this, 'on_clicked'));

        $fixed = new GtkFixed();
        $fixed->put($button, 100, 30);
        $fixed->put($this->label, 30, 90);
        $this->add($fixed);
       
        $this->set_default_size(350, 200); 
        $this->set_position(GTK::WIN_POS_CENTER);
        $this->show_all();         
    }

    public function on_clicked($sender) {

        $fdia = new GtkFontSelectionDialog("Select font name");
        $response = $fdia->run();
              
        if ($response == Gtk::RESPONSE_OK) {

            $font_desc = new PangoFontDescription($fdia->get_font_name());
            print($fdia->get_font_name());
            if ($font_desc) {
                $this->label->modify_font($font_desc);
            }
            
        }

        $fdia->destroy();
    }
} 
     
new Example(); 
Gtk::main();
 
?>
In the code example, we have a button and a label. We show the GtkFontSelectionDialog by clicking on the button.
$fdia = new GtkFontSelectionDialog("Select font name");
We create the GtkFontSelectionDialog.
if ($response == Gtk::RESPONSE_OK) {

    $font_desc = new PangoFontDescription($fdia->get_font_name());
    print($fdia->get_font_name());
    if ($font_desc) {
        $this->label->modify_font($font_desc);
    }
    
}
If we click on the OK button, the font of the label widget changes to the one, that we selected in the dialog.
GtkFontSelectionDialog
Figure: GtkFontSelectionDialog

GtkColorSelectionDialog

The GtkFontSelectionDialog is a dialog for selecting colors.
<?php

/* 
ZetCode PHP GTK tutorial

This example works with the
GtkColorSelectionDialog.

author: Jan Bodnar
website: www.zetcode.com
last modified: August 2011
*/
 
class Example extends GtkWindow { 
     
    private $label;

    public function __construct() { 

        parent::__construct(); 
         
        $this->init_ui();

    } 

    private function init_ui() {

        $this->set_title('GtkColorSelectionDialog');         
        $this->connect_simple('destroy', array('gtk', 'main_quit')); 

        $this->set_border_width(10);
        $this->label = new GtkLabel("The only victory over love is flight.");
        $button = new GtkButton("Select color");
        $button->connect('clicked', array($this, 'on_clicked'));

        $fixed = new GtkFixed();
        $fixed->put($button, 100, 30);
        $fixed->put($this->label, 30, 90);
        $this->add($fixed);
       
        $this->set_default_size(350, 200); 
        $this->set_position(GTK::WIN_POS_CENTER);
        $this->show_all();         
    }

    public function on_clicked($sender) {

        $cdia = new GtkColorSelectionDialog("Select color");
        $response = $cdia->run();
              
        if ($response == Gtk::RESPONSE_OK) {
            $colorsel = $cdia->colorsel;
            $color = $colorsel->get_current_color();
            $this->label->modify_fg(Gtk::STATE_NORMAL, $color);
        }
        
        $cdia->destroy();
    }
} 
     
new Example(); 
Gtk::main();
 
?>
The example is very similar to the previous one. This time we change the color of the label.
$cdia = new GtkColorSelectionDialog("Select color");
$response = $cdia->run();
We create and run the GtkFontSelectionDialog.
if ($response == Gtk::RESPONSE_OK) {
    $colorsel = $cdia->colorsel;
    $color = $colorsel->get_current_color();
    $this->label->modify_fg(Gtk::STATE_NORMAL, $color);
}
If the user presses OK, we get the color value and modify the label's color.
In this part of the PHP GTK tutorial, we presented dialogs.

Menus And toolbars in PHP GTK

In this part of the PHP GTK programming tutorial, we will work with menus & toolbars.
A common part in a GUI application is a menubar. A menubar consists of objects called menus. Top-level menus have their labels on the menubar. The menus have menu items. Menu items are commands that perform a specific action inside the application. Menus can also have submenus, which have their own menu items.

Simple menu

In our first example, we will create a menubar with one file menu. The menu will have only one menu item. By selecting the item the application quits.
<?php

/* 
ZetCode PHP GTK tutorial

This example shows a simple menu.

author: Jan Bodnar
website: www.zetcode.com
last modified: August 2011
*/
 
class Example extends GtkWindow { 
     

    public function __construct() { 

        parent::__construct(); 
         
        $this->init_ui();

    } 

    public function init_ui() {

        $this->set_title('Simple menu');         
        $this->connect_simple('destroy', array('gtk', 'main_quit')); 

        $this->modify_bg(Gtk::STATE_NORMAL, new GdkColor(6400, 6400, 6440));
       
        $mb = new GtkMenuBar();

        $filemenu = new GtkMenu();
        $filemi = new GtkMenuItem("File");
        $filemi->set_submenu($filemenu);
       
        $exitmi = new GtkMenuItem("Exit");
        $exitmi->connect_simple('activate', array('gtk', 'main_quit'));              
        $filemenu->append($exitmi);

        $mb->append($filemi);

        $vbox = new GtkVBox(false, 2);
        $vbox->pack_start($mb, false, false, 0);

        $this->add($vbox);

        $this->set_default_size(250, 200); 
        $this->set_position(GTK::WIN_POS_CENTER);
        $this->show_all();         
    }
} 
     
new Example(); 
Gtk::main();
 
?>
This is a small example with minimal menubar functionality.
$mb = new GtkMenuBar();
The GtkMenuBar widget is created. This is a container for the individual menus.
$filemenu = new GtkMenu();
$filemi = new GtkMenuItem("File");
$filemi->set_submenu($filemenu);
Toplevel GtkMenuItem is created. A menu item represents an action in a GUI application.
$exitmi = new GtkMenuItem("Exit");
$exitmi->connect_simple('activate', array('gtk', 'main_quit'));              
$filemenu->append($exitmi);
Exit GtkMenuItem is created and appended to the File GtkMenuItem.
$mb->append($filemi);
Toplevel GtkMenuItem is appended to the GtkMenuBar widget.
$vbox = new GtkVBox(false, 2);
$vbox->pack_start($mb, false, false, 0);
Unlike in other toolkits, we have to take care of the layout management of the menubar ourselves. We put the menubar into the vertical box.
Simple menu
Figure: Simple menu

Submenu

Our final example demonstrates how to create a submenu. A submenu is a menu inside another menu.
<?php

/* 
ZetCode PHP GTK tutorial

This example shows a submenu.

author: Jan Bodnar
website: www.zetcode.com
last modified: August 2011
*/
 
class Example extends GtkWindow { 
     

    public function __construct() { 

        parent::__construct(); 
         
        $this->init_ui();

    } 

    public function init_ui() {

        $this->set_title('Submenu');         
        $this->connect_simple('destroy', array('gtk', 'main_quit')); 

        $this->modify_bg(Gtk::STATE_NORMAL, new GdkColor(6400, 6400, 6440));
       
        $mb = new GtkMenuBar();

        $filemenu = new GtkMenu();
        $filemi = new GtkMenuItem("File");
        $filemi->set_submenu($filemenu);

        $mb->append($filemi);

        $imenu = new GtkMenu();

        $importm = new GtkMenuItem("Import");
        $importm->set_submenu($imenu);

        $inews = new GtkMenuItem("Import news feed...");
        $ibookmarks = new GtkMenuItem("Import bookmarks...");
        $imail = new GtkMenuItem("Import mail...");

        $imenu->append($inews);
        $imenu->append($ibookmarks);
        $imenu->append($imail);

        $filemenu->append($importm);
       
        $exitmi = new GtkMenuItem("Exit");
        $exitmi->connect_simple('activate', array('gtk', 'main_quit'));
                
        $filemenu->append($exitmi);

        $vbox = new GtkVBox(false, 2);
        $vbox->pack_start($mb, false, false, 0);

        $this->add($vbox);

        $this->set_default_size(320, 250); 
        $this->set_position(GTK::WIN_POS_CENTER);
        $this->show_all();         
    }
} 
     
new Example(); 
Gtk::main();
 
?>
Submenu creation.
$imenu = new GtkMenu();
A submenu is a regular GtkMenu.
$importm = new GtkMenuItem("Import");
$importm->set_submenu($imenu);
It is a submenu of a menu item, which belogs to toplevel file menu.
$inews = new GtkMenuItem("Import news feed...");
$ibookmarks = new GtkMenuItem("Import bookmarks...");
$imail = new GtkMenuItem("Import mail...");

$imenu->append($inews);
$imenu->append($ibookmarks);
$imenu->append($imail);
Submenus have their own menu items.
Submenu
Figure: Submenu

Image menu

In the next example, we will further explore the menus. We will add images and accelerators to our menu items. Accelerators are keyboard shortcuts for activating menu items.
<?php

/* 
ZetCode PHP GTK tutorial

This example shows a menu with
images, accelerators and a separator.

author: Jan Bodnar
website: www.zetcode.com
last modified: August 2011
*/
 
class Example extends GtkWindow { 
     

    public function __construct() { 

        parent::__construct(); 
         
        $this->init_ui();

    } 

    public function init_ui() {

        $this->set_title('Image menu');         
        $this->connect_simple('destroy', array('gtk', 'main_quit')); 

        $this->modify_bg(Gtk::STATE_NORMAL, new GdkColor(6400, 6400, 6440));
       
        $mb = new GtkMenuBar();

        $filemenu = new GtkMenu();
        $filemi = new GtkMenuItem("File");
        $filemi->set_submenu($filemenu);

        $mb->append($filemi);


        $agr = new GtkAccelGroup();
        $this->add_accel_group($agr);

        $newi = new GtkImageMenuItem(Gtk::STOCK_NEW, $agr);
        $newi->add_accelerator('activate', $agr, Gdk::KEY_N, 
             Gdk::CONTROL_MASK, Gtk::ACCEL_VISIBLE);
        $newi->connect_simple('activate', array($this, 'on_new_selected')); 
        $filemenu->append($newi);

        $openmi = new GtkImageMenuItem(Gtk::STOCK_OPEN, $agr);
        $openmi->add_accelerator('activate', $agr, Gdk::KEY_O, 
             Gdk::CONTROL_MASK, Gtk::ACCEL_VISIBLE);
        $filemenu->append($openmi);

        $sep = new GtkSeparatorMenuItem();
        $filemenu->append($sep);

        $exitmi = new GtkImageMenuItem(Gtk::STOCK_QUIT, $agr);
        $exitmi->add_accelerator('activate', $agr, Gdk::KEY_Q, 
             Gdk::CONTROL_MASK, Gtk::ACCEL_VISIBLE);
        $exitmi->connect_simple('activate', array('gtk', 'main_quit'));     
        $filemenu->append($exitmi);       
       
        $vbox = new GtkVBox(false, 2);
        $vbox->pack_start($mb, false, false, 0);

        $this->add($vbox);

        $this->set_default_size(320, 250); 
        $this->set_position(GTK::WIN_POS_CENTER);
        $this->show_all();         
    }

    public function on_new_selected() {
        print "new";
    }

} 
     
new Example(); 
Gtk::main();
 
?>
Our example shows a toplevel menu item with three sublevel menu items. Each of the menu items has an image and an accelerator. The accelerator for the quit menu item quits the application. The accelerator for the new menu item prints 'new' to the console.
$agr = new GtkAccelGroup();
$this->add_accel_group($agr);
To work with accelerators, we create a global GtkAccelGroup object. It will be used later.
$newi = new GtkImageMenuItem(Gtk::STOCK_NEW, $agr);
$newi->add_accelerator('activate', $agr, Gdk::KEY_N, 
      Gdk::CONTROL_MASK, Gtk::ACCEL_VISIBLE);
$newi->connect_simple('activate', array($this, 'on_new_selected')); 
$filemenu->append($newi);
A GtkImageMenuItem is created. The image comes from the stock of images. We create also a Ctrl+N accelerator. When we select the menu item with a mouse or press the accelerator, a message is printed to the console.
$sep = new GtkSeparatorMenuItem();
$filemenu->append($sep);
These lines create a separator. It is used to put menu items into logical groups.
Image menu
Figure: Image menu
Menus group commands that we can use in application. Toolbars provide a quick access to the most frequently used commands.

Simple toolbar

Next we create a simple toolbar. A toolbar provides a quick access to the most frequently used functionality of an application.
<?php

/* 
ZetCode PHP GTK tutorial

This example shows a toolbar widget.

author: Jan Bodnar
website: www.zetcode.com
last modified: August 2011
*/
 
class Example extends GtkWindow { 
     

    public function __construct() { 

        parent::__construct(); 
         
        $this->init_ui();

    } 

    public function init_ui() {

        $this->set_title('Toolbar');         
        $this->connect_simple('destroy', array('gtk', 'main_quit')); 

        $toolbar = new GtkToolbar();
        $toolbar->set_toolbar_style(Gtk::TOOLBAR_ICONS);

        $newtb = GtkToolButton::new_from_stock(Gtk::STOCK_NEW);
        $opentb = GtkToolButton::new_from_stock(Gtk::STOCK_OPEN);
        $savetb = GtkToolButton::new_from_stock(Gtk::STOCK_SAVE);
        $sep = new GtkSeparatorToolItem();
        $quittb = GtkToolButton::new_from_stock(Gtk::STOCK_QUIT);

        $toolbar->insert($newtb, 0);
        $toolbar->insert($opentb, 1);
        $toolbar->insert($savetb, 2);
        $toolbar->insert($sep, 3);
        $toolbar->insert($quittb, 4);
        
        $quittb->connect_simple("clicked", array('Gtk', 'main_quit'));

        $vbox = new GtkVBox(false, 2);
        $vbox->pack_start($toolbar, false, false, 0);

        $this->add($vbox);

        $this->set_default_size(250, 200); 
        $this->set_position(GTK::WIN_POS_CENTER);
        $this->show_all();         
    }
} 
     
new Example(); 
Gtk::main();
 
?>
The example shows a toolbar and four tool buttons.
$toolbar = new GtkToolbar();
A GtkToolbar widget is created.
$toolbar->set_toolbar_style(Gtk::TOOLBAR_ICONS);
On toolbar, we show only icons. No text.
$newtb = GtkToolButton::new_from_stock(Gtk::STOCK_NEW);
A GtkToolButton with an image from stock is created. The image comes from the built-in stock of images.
$sep = new GtkSeparatorToolItem();
This is a separator. It can be used to put toolbar buttons into logical groups.
$toolbar->insert($newtb, 0);
$toolbar->insert($opentb, 1);
...
Toolbar buttons are inserted into the toolbar widget. The first parameter of the insert() method is the tool button. The second is the position on the toolbar.
Toolbar
Figure: Toolbar
In this chapter of the PHP GTK tutorial, we showed, how to work with menus & toolbars.

Widgets in PHP GTK

In this part of the PHP GTK programming tutorial, we will introduce some widgets.
Widgets are basic building blocks of a GUI application. Over the years, several widgets became a standard in all toolkits on all OS platforms. For example a button, a check box or a scroll bar. The GTK toolkit's philosophy is to keep the number of widgets at a minimum level. More specialized widgets are created as custom GTK widgets.

GtkCheckButton

A GtkCheckButton is a widget, that has two states. On and Off. The On state is visualized by a check mark. It is used to denote some boolean property.
<?php
 
/* 
ZetCode PHP GTK tutorial

This program toggles the title of the
window with the GtkCheckButton widget.

author: Jan Bodnar
website: www.zetcode.com
last modified: August 2011
*/

class Example extends GtkWindow { 
     

    public function __construct() { 

        parent::__construct(); 
         
        $this->init_ui();

    } 

    private function init_ui() {

        $this->set_title('Check button');         
        $this->connect_simple('destroy', array('gtk', 'main_quit')); 

        $fixed = new GtkFixed();
        $this->add($fixed);
        
        $cb = new GtkCheckButton("Show title");
        $cb->set_active(true);
        $cb->connect('clicked', array($this, 'on_clicked'));
        $fixed->put($cb, 50, 50);     

        $this->set_default_size(250, 200); 
        $this->set_position(GTK::WIN_POS_CENTER);
        $this->show_all();         
    }

    public function on_clicked($sender) {

        if ($sender->get_active()) {
            $this->set_title("Check button");
        } else {
            $this->set_title("");
        }         
    }
} 
     
new Example(); 
Gtk::main();
 
?>
We will display a title in the titlebar of the window, depending on the state of the GtkCheckButton.
$cb = new GtkCheckButton("Show title");
The GtkCheckButton widget is created. The constructor of the widget takes one parameter, a label. The label is shown next to the check box.
$cb->set_active(true);
The title is visible by default, so we check the check button by default.
$cb->connect('clicked', array($this, 'on_clicked'));
If we click on the check box widget a clicked signal is emitted. We hook the on_clicked() method to the signal.
if ($sender->get_active()) {
    $this->set_title("Check button");
} else {
    $this->set_title("");
}     
We show the title, if the button is checked. The get_active() method is used to determine the state of the check button. The set_title() method is used to set the title of the window. To clear the title of the window, we use an empty string.
GtkCheckButton
Figure: GtkCheckButton

GtkLabel

The GtkLabel widget shows text. No user interaction is available with this widget.
<?php
 
/* 
ZetCode PHP GTK tutorial

In this example, we show a text on the
window. For this, we use the GtkLabel widget.

author: Jan Bodnar
website: www.zetcode.com
last modified: August 2011
*/

class Example extends GtkWindow { 
     

    public function __construct() { 

        parent::__construct(); 
         
        $this->init_ui();
    } 

    private function init_ui() {

        // no trailing white space!
        $lyrics = <<<LYRICS
Meet you downstairs in the bar and heard
your rolled up sleeves and your skull t-shirt
You say why did you do it with him today?
and sniff me out like I was Tanqueray

cause you're my fella, my guy
hand me your stella and fly
by the time I'm out the door
you tear men down like Roger Moore

I cheated myself
like I knew I would
I told ya, I was trouble
you know that I'm no good
LYRICS;

        $this->set_title('GtkLabel');         
        $this->connect_simple('destroy', array('gtk', 'main_quit')); 

        $this->set_border_width(10);
        $label = new GtkLabel($lyrics);
        $this->add($label);

        $this->set_default_size(250, 200); 
        $this->set_position(GTK::WIN_POS_CENTER);
        $this->show_all();         
    }
} 
     
new Example(); 
Gtk::main();
 
?>
The code example shows some lyrics on the window.
    // no trailing white space!
    $lyrics = <<<LYRICS
Meet you downstairs in the bar and heard
your rolled up sleeves and your skull t-shirt
We create a multi-line text. In PHP, a multi-line text can be created using the heredoc syntax.
$this->set_border_width(10);
The GtkLabel is surrounded by some empty space.
$label = new GtkLabel($lyrics);
$this->add($label);
The GtkLabel widget is created and added to the window.
GtkLabel Widget
Figure: GtkLabel Widget

GtkEntry

The GtkEntry is a single line text entry field. This widget is used to enter textual data.
<?php
 
/* 
ZetCode PHP GTK tutorial

This example demonstrates the GtkEntry widget.

author: Jan Bodnar
website: www.zetcode.com
last modified: August 2011
*/

class Example extends GtkWindow { 
     
    private $label;

    public function __construct() { 

        parent::__construct(); 
         
        $this->init_ui();

    } 

    private function init_ui() {

        $this->set_title('GtkEntry');         
        $this->connect_simple('destroy', array('gtk', 'main_quit')); 

        $fixed = new GtkFixed();              

        $this->label = new GtkLabel("...");
        $fixed->put($this->label, 60, 40);

        $entry = new GtkEntry();
        $fixed->put($entry, 60, 100);
        $entry->connect('key_release_event', array($this, 'on_key_release'));

        $this->add($fixed); 

        $this->set_default_size(250, 200); 
        $this->set_position(GTK::WIN_POS_CENTER);
        $this->show_all();         
    }

    public function on_key_release($sender, $event) {

        $this->label->set_text($sender->get_text());
    }
} 
     
new Example(); 
Gtk::main();
 
?>
This example shows an entry widget and a label. The text that we key in the entry is displayed immediately in the label widget.
$entry = new GtkEntry();
GtkEntry widget is created.
$entry->connect('key_release_event', array($this, 'on_key_release'));
We plug the the on_key_release() method to the key_release_event of the GtkEntry widget.
public function on_key_release($sender, $event) {

    $this->label->set_text($sender->get_text());
}
Inside the method, we get the text from the GtkEntry widget via the get_text() method and set it to the label using the set_text() method of the label.
GtkEntry Widget
Figure: GtkEntry Widget

GtkImage

The GtkImage widget shows an image.
<?php
 
/* 
ZetCode PHP GTK tutorial

This example demonstrates the GtkImage widget.

author: Jan Bodnar
website: www.zetcode.com
last modified: August 2011
*/

class Example extends GtkWindow { 
     

    public function __construct() { 

        parent::__construct(); 
         
        $this->init_ui();

    } 

    private function init_ui() {

        $this->set_title('Red Rock');         
        $this->connect_simple('destroy', array('gtk', 'main_quit')); 
        
        $this->set_border_width(2);
        $image = GtkImage::new_from_file("redrock.png");                        
        $this->add($image);

        $this->set_default_size(250, 200); 
        $this->set_position(GTK::WIN_POS_CENTER);
        $this->show_all();         
    }
} 
     
new Example(); 
Gtk::main();
 
?>
In our example, we show an image on the window.
$this->set_border_width(2);
We put some empty border around the image.
$image = GtkImage::new_from_file("redrock.png");
The GtkImage widget is created. We load the image from the file using the static new_from_file() method. If the file isn't found or can't be loaded, the resulting GtkImage will display a broken image icon.
$this->add($image);
Widget is added to the container.

GtkComboBox

A ComboBox is a widget that allows the user to choose from a list of options.
 
<?php

/* 
ZetCode PHP GTK tutorial

This example demonstrates the GtkComboBox widget

author: Jan Bodnar
website: www.zetcode.com
last modified: August 2011
*/

class Example extends GtkWindow { 
     
    private $label;

    public function __construct() { 

        parent::__construct(); 
         
        $this->init_ui();

    } 

    private function init_ui() {

        $this->set_title('GtkComboBox');         
        $this->connect_simple('destroy', array('gtk', 'main_quit')); 
        
        $fixed = new GtkFixed();
        $this->label = new GtkLabel('-');
        $fixed->put($this->label, 50, 140);

        $cb = GtkComboBox::new_text();
        $cb->connect('changed', array($this, 'on_changed'));
        
        $cb->append_text('Ubuntu');
        $cb->append_text('Mandriva');
        $cb->append_text('Redhat');
        $cb->append_text('Gentoo');
        $cb->append_text('Mint');

        $fixed->put($cb, 50, 30);

        $this->add($fixed);

        $this->set_default_size(250, 200); 
        $this->set_position(GTK::WIN_POS_CENTER);
        $this->show_all();         
    }

    public function on_changed($sender) {
        $this->label->set_label($sender->get_active_text());
    }
} 
     
new Example(); 
Gtk::main();
 
?>
The example shows a combo box and a label. The combo box has a list of five options. These are the names of Linux Distros. The label widget shows the selected option from the combo box.
$cb = GtkComboBox::new_text();
The GtkComboBox widget is created. The new_text() is a method, that creates a GtkComboBox just displaying strings.
$cb->append_text('Ubuntu');
$cb->append_text('Mandriva');
$cb->append_text('Redhat');
$cb->append_text('Gentoo');
$cb->append_text('Mint');
It is filled with data.
public function on_changed($sender) {
    $this->label->set_label($sender->get_active_text());
}
Inside the on_changed() method, we get the selected text out of the combo box and set it to the label.
GtkComboBox
Figure: GtkComboBox
In this chapter of the PHP GTK tutorial, we showed some basic widgets.

Layout management in PHP GTK

In this chapter we will show how to lay out our widgets in windows or dialogs.
When we design the GUI of our application, we decide what widgets we will use and how we will organize those widgets in the application. To organize our widgets, we use specialized non visible widgets called layout containers. In this chapter, we will mention GtkAlignment, GtkFixed, GtkVBox and GtkTable.

GtkFixed

The GtkFixed container places child widgets at fixed positions and with fixed sizes. This container performs no automatic layout management. In most applications, we don't use this container. There are some specialized areas, where we use it. For example games, specialized applications that work with diagrams, resizable components that can be moved (like a chart in a spreadsheet application), small educational examples.
<?php

/* 
ZetCode PHP GTK tutorial

In this program, we lay out widgets
using absolute positioning.

author: Jan Bodnar
website: www.zetcode.com
last modified: September 2011
*/
 
class Example extends GtkWindow { 
     

    public function __construct() { 

        parent::__construct(); 
         
        $this->init_ui();

    } 

    public function init_ui() {

        $this->set_title('Fixed');         
        $this->connect_simple('destroy', array('gtk', 'main_quit')); 

        $this->modify_bg(Gtk::STATE_NORMAL, new GdkColor(6400, 6400, 6440));

        $bardejov = GtkImage::new_from_file("bardejov.jpg");
        $rotunda = GtkImage::new_from_file("rotunda.jpg");
        $mincol = GtkImage::new_from_file("mincol.jpg");
        
        $fixed = new GtkFixed();
        $fixed->put($bardejov, 20, 20);
        $fixed->put($rotunda, 40, 160);
        $fixed->put($mincol, 170, 50);

        $this->add($fixed);        


        $this->set_default_size(300, 280); 
        $this->set_position(GTK::WIN_POS_CENTER);
        $this->show_all();         
 
    }
} 
     
new Example(); 
Gtk::main();
 
?>
In our example, we show three small images on the window. We explicitly specify the x, y coordinates, where we place these images.
$this->modify_bg(Gtk::STATE_NORMAL, new GdkColor(6400, 6400, 6440));
For better visual experience, we change the background color to dark gray.
$bardejov = GtkImage::new_from_file("bardejov.jpg");
The GtkImage is a widget, that is used to display images. The picture is loaded from the file on the disk.
$fixed = new GtkFixed();
We create the GtkFixed container.
$fixed->put($bardejov, 20, 20);
We place the first image at x=20, y=20 coordinates.
w.add(fixed);
Finally, we add the GtkFixed container to the Window.
Fixed
Figure: Fixed

Buttons

In this code example, we will use a vertical box, a horizontal box and an alignment widget. A horizontal box arranges widgets in a single row. Similarly, a vertical box places its widgets in one column. The Alignment container controls the alignment and the size of its child widget.
<?php
 
/* 
ZetCode PHP GTK tutorial

In this program, we position two buttons
in the bottom right corner of the window.
We use horizontal and vertical boxes.

author: Jan Bodnar
website: www.zetcode.com
last modified: August 2011
*/

class Example extends GtkWindow { 
     

    public function __construct() { 

        parent::__construct(); 
         
        $this->init_ui();

    } 

    public function init_ui() {

        $this->set_title('Buttons');         
        $this->connect_simple('destroy', array('gtk', 'main_quit')); 
        $this->set_border_width(3);

        $vbox = new GtkVBox(false, 5);
        $hbox = new GtkHBox(true, 3);

        $frame = new GtkFrame();
        $vbox->pack_start($frame, true, true, 0);

        $okButton = new GtkButton("OK");
        $okButton->set_size_request(70, 30);
        $closeButton = new GtkButton("Close");

        $hbox->add($okButton);
        $hbox->add($closeButton);
        
        $halign = new GtkAlignment(1, 0, 0, 0);
        $halign->add($hbox);
        $vbox->pack_start($halign, false, false, 3);

        $this->add($vbox);        

        $this->set_default_size(260, 150); 
        $this->set_position(GTK::WIN_POS_CENTER);
        $this->show_all();          
    }
} 
     
new Example(); 
Gtk::main();
 
?>
In the code example, we place two buttons into the right bottom corner of the window. To accomplish this, we use one horizontal box and one vertical box and one alignment container.
$vbox = new GtkVBox(false, 5);
A vertical box container is created. We set the homogeneous member to false. This means that widgets put into the vertical box will hot have the same size. The vertical spacing between widgets is set to 5 pixels.
$frame = new GtkFrame();
Here we create a GtkFrame widget. The purpose of this widget is to take up space above the two buttons.
$vbox->pack_start($frame, true, true, 0);
Here we place the frame widget into the vertical box. The first parameter of the method is the widget, which is being placed into the box. The following three parameters are expand, fill and padding. The expand parameter is set to true, which means that free space will be allocated around the widget. When the fill parameter is set to true, the widget actually takes up all the free space around it. There is no padding around the child widget.
$hbox = new GtkHBox(true, 3);  
This code line creates a horizontal box. All widgets inside the box will have the same size. There will be 3px space between the widgets horizontally.
$okButton = new GtkButton("OK");
$okButton->set_size_request(70, 30);
$closeButton = new GtkButton("Close");

$hbox->add($okButton);
$hbox->add($closeButton);
We create two buttons and put them inside the horizontal box.
$halign = new GtkAlignment(1, 0, 0, 0);
$halign->add($hbox);
$vbox->pack_start($halign, false, false, 3);
This will create an alignment container that will place its child widget to the right. The xalign member set to 1.0 will put all free space to the left of the horizontal box. This will push the two buttons to the right. We add the horizontal box into the alignment container and pack the alignment container into the vertical box. We must keep in mind that the alignment container takes only one child widget. That's why we must use the horizontal box.
Buttons
Figure: Buttons

Calculator skeleton

The GtkTable widget arranges widgets in rows and columns.
<?php
 
/* 
ZetCode PHP GTK tutorial

In this program we create a skeleton of
a calculator. We use the GtkTable widget.

author: Jan Bodnar
website: www.zetcode.com
last modified: August 2011
*/

class Example extends GtkWindow { 
     

    public function __construct() { 

        parent::__construct(); 
         
        $this->init_ui();

    } 

    public function init_ui() {

        $this->set_title('Calculator');         
        $this->connect_simple('destroy', array('gtk', 'main_quit')); 

        $vbox = new GtkVBox(false, 2);

        $mb = new GtkMenubar();
        $filemenu = new GtkMenu();
        $filemi = new GtkMenuItem("File");
        $filemi->set_submenu($filemenu);
        $mb->append($filemi);

        $vbox->pack_start($mb, false, false, 0);

        $table = new GtkTable(5, 4, true);

        $table->attach_defaults(new GtkButton("Cls"), 0, 1, 0, 1);
        $table->attach_defaults(new GtkButton("Bck"), 1, 2, 0, 1);
        $table->attach_defaults(new GtkLabel(), 2, 3, 0, 1);
        $table->attach_defaults(new GtkButton("Close"), 3, 4, 0, 1);

        $table->attach_defaults(new GtkButton("7"), 0, 1, 1, 2);
        $table->attach_defaults(new GtkButton("8"), 1, 2, 1, 2);
        $table->attach_defaults(new GtkButton("9"), 2, 3, 1, 2);
        $table->attach_defaults(new GtkButton("/"), 3, 4, 1, 2);

        $table->attach_defaults(new GtkButton("4"), 0, 1, 2, 3);
        $table->attach_defaults(new GtkButton("5"), 1, 2, 2, 3);
        $table->attach_defaults(new GtkButton("6"), 2, 3, 2, 3);
        $table->attach_defaults(new GtkButton("*"), 3, 4, 2, 3);

        $table->attach_defaults(new GtkButton("1"), 0, 1, 3, 4);
        $table->attach_defaults(new GtkButton("2"), 1, 2, 3, 4);
        $table->attach_defaults(new GtkButton("3"), 2, 3, 3, 4);
        $table->attach_defaults(new GtkButton("-"), 3, 4, 3, 4);

        $table->attach_defaults(new GtkButton("0"), 0, 1, 4, 5);
        $table->attach_defaults(new GtkButton("."), 1, 2, 4, 5);
        $table->attach_defaults(new GtkButton("="), 2, 3, 4, 5);
        $table->attach_defaults(new GtkButton("+"), 3, 4, 4, 5);

        $vbox->pack_start(new GtkEntry(), false, false, 0);
        $vbox->pack_end($table, true, true, 0);

        $this->add($vbox);        

        $this->set_default_size(300, 250); 
        $this->set_position(GTK::WIN_POS_CENTER);
        $this->show_all();         
 
    }
} 
     
new Example(); 
Gtk::main();
 
?>
We use the GtkTable widget to create a calculator skeleton.
$table = new GtkTable(5, 4, true);
We create a table widget with 5 rows and 4 columns. The third parameter is the homogenous parameter. If set to true, all the widgets in the table are of the same size. The size of all widgets is equal to the largest widget in the table container.
$table->attach_defaults(new GtkButton("Cls"), 0, 1, 0, 1);
We attach a button to the table container. To the top-left cell of the table. The first two parameters are the left and right sides of the cell, the last two parameters are the top and left sides of the cell.
$vbox->pack_end($table, true, true, 0);
We pack the table widget into the vertical box.
Calculator skeleton
Figure: Calculator skeleton

Windows

Next we will create a more advanced example. We show a window, that can be found in the JDeveloper IDE.
<?php
 
/* 
ZetCode PHP GTK tutorial

This is a more complicated layout example.
We use GtkAlignment and GtkTable widgets. 

author: Jan Bodnar
website: www.zetcode.com
last modified: August 2011
*/

class Example extends GtkWindow { 
     

    public function __construct() { 

        parent::__construct(); 
         
        $this->init_ui();
    } 

    public function init_ui() {

        $this->set_title('Windows');         
        $this->connect_simple('destroy', array('gtk', 'main_quit')); 

        $this->set_border_width(15);

        $table = new GtkTable(8, 4, false);
        $table->set_col_spacings(3);
        
        $title = new GtkLabel("Windows");
       
        $halign = new GtkAlignment(0, 0, 0, 0);
        $halign->add($title);        
        $table->attach($halign, 0, 1, 0, 1, GTK::FILL, 
            GTK::FILL, 0, 0);
        
        $frame = new GtkFrame();
        $table->attach($frame, 0, 2, 1, 3, GTK::FILL | Gtk::EXPAND,
            GTK::FILL | GTK::EXPAND, 1, 1);

        $activate = new GtkButton("Activate");
        $activate->set_size_request(50, 30);
        $table->attach($activate, 3, 4, 1, 2, GTK::FILL,
            GTK::SHRINK, 1, 1);

        $valign = new GtkAlignment(0, 0, 0, 0);
        $close = new GtkButton("Close");
        $close->set_size_request(70, 30);
        $valign->add($close);
        $table->set_row_spacing(1, 3);
        $table->attach($valign, 3, 4, 2, 3, Gtk::FILL,
            Gtk::FILL | Gtk::EXPAND, 1, 1);

        $halign2 = new GtkAlignment(0, 1, 0, 0);
        $help = new GtkButton("Help");
        $help->set_size_request(70, 30);
        $halign2->add($help);
        $table->set_row_spacing(3, 6);
        $table->attach($halign2, 0, 1, 4, 5, Gtk::FILL,
            Gtk::FILL, 0, 0);
        
        $ok = new GtkButton("OK");
        $ok->set_size_request(70, 30);
        $table->attach($ok, 3, 4, 4, 5, Gtk::FILL,
            Gtk::FILL, 0, 0);

        $this->add($table);        

        $this->set_default_size(300, 250); 
        $this->set_position(GTK::WIN_POS_CENTER);
        $this->show_all();         
    }
} 
     
new Example(); 
Gtk::main();
 
?>
The code example shows, how we can create a similar window in PHP GTK.
$table = new GtkTable(8, 4, false);
$table->set_col_spacings(3);
The example is based on the GtkTable container. There will be 3px space between columns.
$title = new GtkLabel("Windows");

$halign = new GtkAlignment(0, 0, 0, 0);
$halign->add($title);        
$table->attach($halign, 0, 1, 0, 1, GTK::FILL, 
    GTK::FILL, 0, 0);
This code creates a label, that is aligned to the left. The label is placed in the first row of the first column of the Table container.
$frame = new GtkFrame();
$table->attach($frame, 0, 2, 1, 3, GTK::FILL | Gtk::EXPAND,
    GTK::FILL | GTK::EXPAND, 1, 1);
The frame widget spans two rows and two columns. It will consume all free space around it. Thus, taking the bulk of the area of the window.
$valign = new GtkAlignment(0, 0, 0, 0);
$close = new GtkButton("Close");
$close->set_size_request(70, 30);
$valign->add($close);
$table->set_row_spacing(1, 3);
$table->attach($valign, 3, 4, 2, 3, Gtk::FILL,
    Gtk::FILL | Gtk::EXPAND, 1, 1);
We put the close button next to the frame widget into the fourth column. (we count from zero) We add the button into the alignment widget, so that we can align it to the top.
$halign2 = new GtkAlignment(0, 1, 0, 0);
$help = new GtkButton("Help");
$help->set_size_request(70, 30);
$halign2->add($help);
$table->set_row_spacing(3, 6);
$table->attach($halign2, 0, 1, 4, 5, Gtk::FILL,
    Gtk::FILL, 0, 0);
The help button is placed into the alignment widget, so that it can be left aligned in its table cell. It is placed at the first column, fifth row.
$ok = new GtkButton("OK");
$ok->set_size_request(70, 30);
$table->attach($ok, 3, 4, 4, 5, Gtk::FILL,
    Gtk::FILL, 0, 0);
Finally the ok button. It is placed at the fourth column, fifth row.
Windows
Figure: Windows
In this part of the PHP GTK tutorial, we mentioned layout management of widgets.